쿠버네티스 Pod 외부접속 with nginx, websocket
이 포스팅은 아직 작성 중 입니다. (WIP)
쿠버네티스 Pod 외부접속 with nginx, websocket
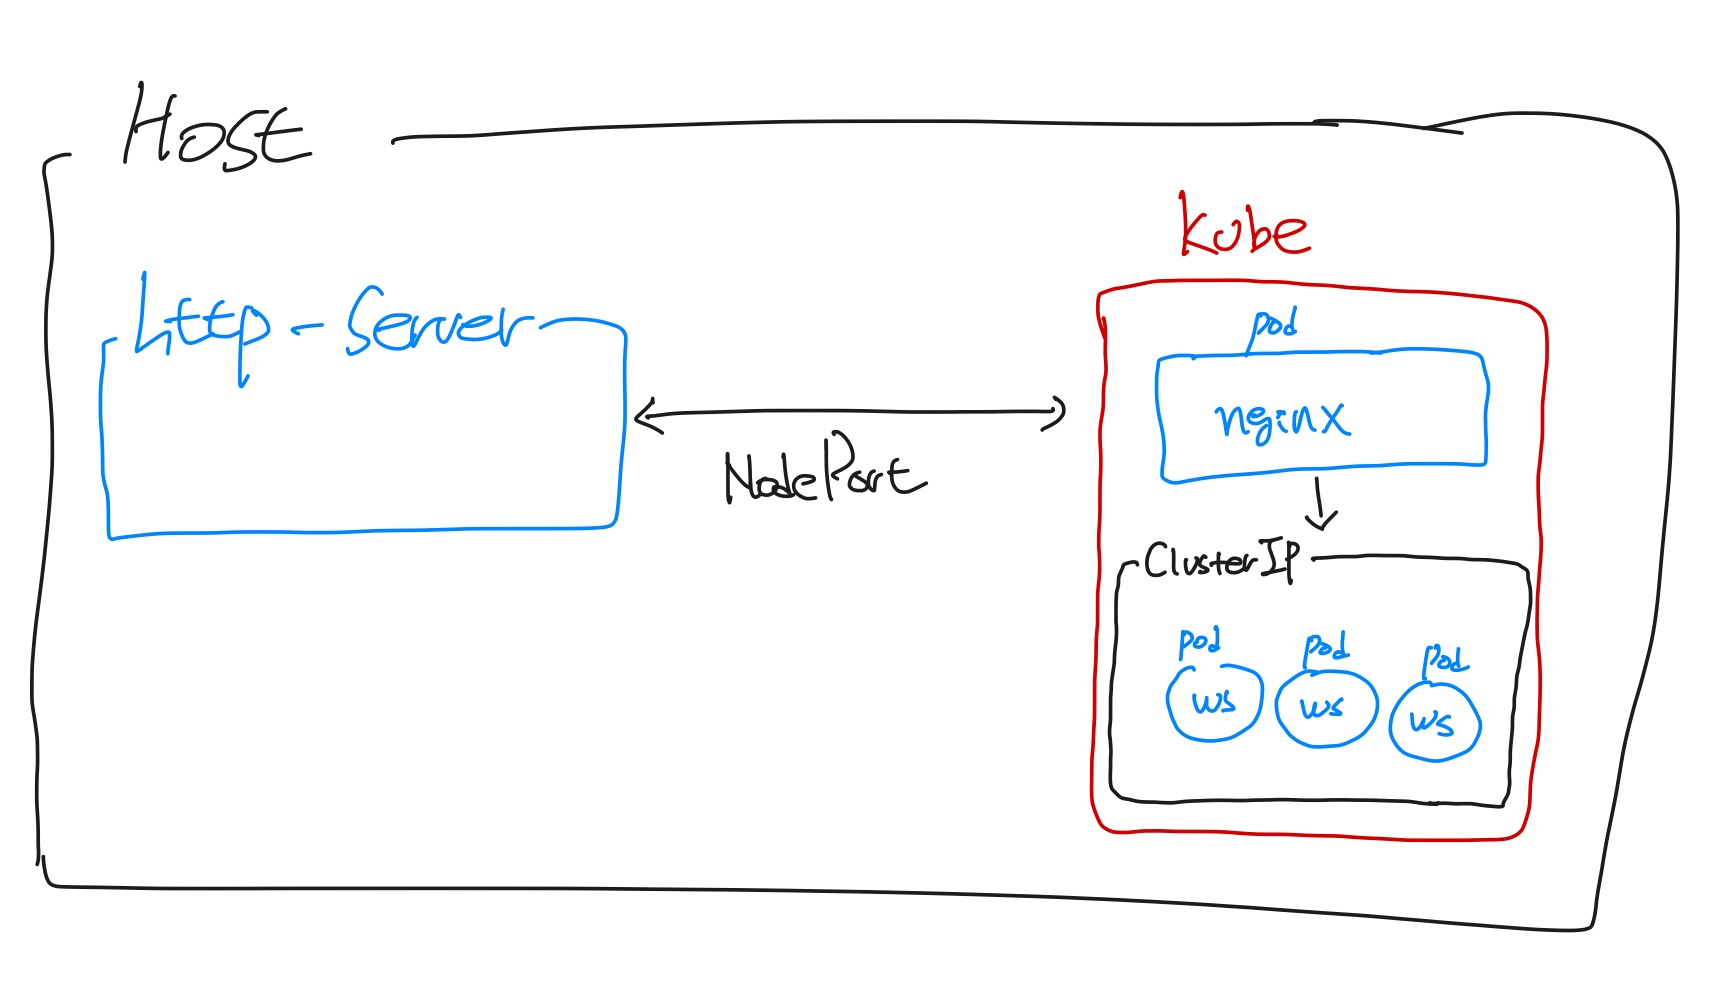
로컬 개발 환경을 셋팅하다가, 쿠버네티스에 clusterIP로 설정한 웹 소켓 어플리케이션(pod)들과 host의 express 서버가 서로 통신이 필요한 상황이 왔다.
clusterIP로 설정한 pod는 쿠버네티스의 내부 사설 아이피를 할당 받게된다.
host에서 해당 pod로 접근하려면 NodePort로 변경해야하지만 ClusterIP를 유지하면서 Nginx로 proxy를 해보았다.
그림으로 표현하면 아래와 같다
Service 생성
서비스는 2개를 생성한다. (NodePort와 ClusterIP)
NodePort는 호스트와 통신하기위한 Nginx pod의 서비스, ClusterIP는 통신의 최종 도착지인 다른 pod 서비스이다.
# NodePort Service
apiVersion: v1
kind: Service
metadata:
  name: nginx-service
spec:
  selector:
    app: nginx
  type: NodePort
  ports:
  - name: http
    port: 80
    targetPort: 80
    nodePort: 32088 # 호스트와 통신할 외부 포트
    protocol: TCP
# ClusterIP Service
kind: Service
apiVersion: v1
metadata:
  namespace: default
  name: my-application-service
spec:
  selector:
    app: my-application
  type: ClusterIP
  clusterIP: None
  ports:
  - port: 32088
    targetPort: 32088
Nginx 설정
nginx pod를 생성해보자
nginx의 설정 파일(sites.conf, nginx.conf. mime.types)들은 따로 생성하여 볼륨 마운트 시켰다
# Nginx Deployment
apiVersion: apps/v1
kind: Deployment
metadata:
  name: nginx-deployment
  labels:
    app: nginx
spec:
  replicas: 1
  selector:
    matchLabels:
      app: nginx
  template:
    metadata:
      labels:
        app: nginx
    spec:
      containers:
      - name: nginx
        image: nginx:1.14.2
        ports:
        - containerPort: 80
        volumeMounts:
        - name: config
          mountPath: /etc/nginx
      volumes:
      - name: config
        hostPath:
            path: /Users/beenchangseo/deploy/k8s/nginx/config
            type: Directory
sites.conf
내가 테스트 할 호스트 어플리케이션은 http 서버이고 ClusterIP 서비스에 올려놓은 pod는 websocket 서버이다.
흐름은 아래 구조와 같다
http server -> nginx -> websocket server pod
nginx를 웹소켓 proxy로 사용할 수 있도록 아래와 같이 sites.conf를 설정 해준다.
# sites.conf
map $http_upgrade $connection_upgrade {
    default upgrade;
    '' close;
}

server {
	listen 80;
	server_name marketdata;

	location /my-application/ws {
        proxy_pass http://my-application.default.svc.cluster.local:32088;
        proxy_http_version 1.1;
        proxy_set_header Upgrade $http_upgrade;
        proxy_set_header Connection $connection_upgrade;
    }
}
nginx.conf
nginx.conf 설정은 log_format만 수정했다.
# nginx.conf
user nginx;
worker_processes auto;
worker_cpu_affinity auto;
worker_rlimit_nofile 65535;
pid /run/nginx.pid;

events {
    worker_connections 1024;
}

http {
    include /etc/nginx/mime.types;

    default_type application/octet-stream;

    log_format compression '$remote_addr - $remote_user [$time_local] '
                        '"$request" $status $body_bytes_sent '
                        '"$http_referer" "$http_user_agent" "$gzip_ratio"';

    access_log /var/log/nginx/access.log compression;

    error_log /var/log/nginx/error.log;

    include ./sites.conf;
}
mime.types
mime.types는 대충 인터넷에서 긁어왔다.
# mime.types
types {
    text/html                             html htm shtml;
    text/css                              css;
    text/xml                              xml;
    image/gif                             gif;
    image/jpeg                            jpeg jpg;
    application/javascript                js;
    ...
    ... 중략
    ...
    video/x-msvideo                       avi;
}
nginx pod에 올리기
쿠버네티스에 nginx pod를 생성한다.
kubectl apply -f nginx_service.yaml
kubectl apply -f nginx_deployment.yaml
로그가 잘 나오는지도 확인 해보자
kubectl get po | grep nginx
NAME                     READY     STATUS    RESTARTS   AGE       IP            NODE
nginx-3800858182-jr4a2   1/1       Running   0          13s       x.x.x.x


kubectl logs -f nginx-deployment-xxxxxxxx-xxxxx
[21/4/2024:02:54:45 +0000] - *.*.*.* | *.*.*.* - "GET / HTTP/1.1" 200 6180 "-" "Mozilla/5.0 (Windows NT 10.0; Win64; x64) AppleWebKit/537.36 (KHTML, like Gecko) Chrome/88.0.4324.182 Safari/537.36"
websocket server pod 올리기
실험용 테스트 웹 소켓 서버 pod를 생성해보자
아래 소스코드를 docker image로 build 후 pod에 올릴 생각이다.
import * as WebSocket from 'ws';
import * as express from 'express';

const app = express();

const server = app.listen(32088, () => {
    console.log('Server is listening on port 32088');
});

const wss = new WebSocket.Server({ server });
docker build 과정 생략...
이미지가 잘 만들어졌다면 이제 웹 소켓 서버를 pod에 올리자
# Websocket server deployment
apiVersion: apps/v1
kind: Deployment
metadata:
  labels:
    app: my-application
  name: my-application
spec:
  replicas: 1
  selector:
    matchLabels:
      app: my-application
  template:
    metadata:
      labels:
        app: my-application
    spec:
      containers:
      - image: my-application:latest
        imagePullPolicy: IfNotPresent
        name: my-application
        resources: {}
        terminationMessagePath: /dev/termination-log
        terminationMessagePolicy: File
      dnsPolicy: ClusterFirst
status: {}
쿠버네티스에 아까 작성해놓은 ClusterIP Service와 websocket server pod를 생성한다.
kubectl apply -f clusterip_service.yaml
kubectl apply -f my_application_deployment.yaml
로그가 잘 나오는지도 확인 해보자
kubectl get po | grep my-application
NAME                            READY     STATUS    RESTARTS   AGE       IP            NODE
my-application-xxxxxxxx-xxxxx   1/1       Running   0          13s       x.x.x.x


kubectl logs -f my-application-xxxxxxxx-xxxxx
Server is listening on port 32088